Thursday, September 6, 2012

Wrap it up Thursday - Back to School Teacher Gift


What is the connection between teaching and apples.  I did a little research and two theories emerge.  One, it was a gift of food for poorly paid teachers and the other,  it represented a gesture of good health.  Perhaps it is a combination of the two, but for whatever reason, apples have become representative of the relationship between teacher and student.

I thought it would be cute to take the little eos lip balm in melon (almost red don't you think?) and add a welcome back to some paper leaves and when that looked too plain I cut off an actual apple stem.  The leaves and stem were easily attached with a little sticky - tac.

A nice gesture for the first week of school, I thought.


But hey, if your teacher is really special (and what teacher isn't) and you have the time there are a few other little things you could do ...


The classic apple was reimagined as an adorable cupcake by the authors of  Hello Cupcake. (top picture)  I love the Back to the Grind from Jacolyn Murphy. (there is a tea one as well)  The sweet lined paper pouches are from Heather Shaw's Pi'losale on Etsy.  Bakerella opted to do pencils as a push- pop instead of a cakepop.  I really want to try to make cupcakes like that!   I struggle with cake pops but The Crafting Chicks via Skip to my Lou made an adorable mini oreo pop that might be a little easier than a traditional cakepop.


Well ... Back to School ... Back to Reality ... Back to the grind.  Just like the fresh new notebooks of school - I'm starting fresh this fall - into the throes of purging out the old and unnecessary and focusing on a clean fresh start for the new year of school.  Instead of feeling sad at the summer ending, I'm welcoming back clean, crisp air and a new year of possibilities.

Tuesday, September 4, 2012

Babysitting Craft Kit - Plastic Rings


Who knew you could repurpose plastic milk carton rings into fun jewelry?  Well,  I saw this a lifetime ago in American Girl or some kind of kid's craft magazine.  I can't find the original story but I decided to do a new version, for the babysitting gigs the girls start getting in the fall. 


They have a group of girls they babysit that love to craft and it is always fun to find something for them to do that doesn't require alot of supplies or make a huge mess.


With a layer of glue, a piece of yarn or twine (one with the addition of a paper initial) can be wrapped in a circular design starting at the center.  (top photo and lower left)

Layers of paper tape can be arranged in a design and then lifted onto the front of the ring and then clipped and wrapped to fit. (middle row)

With a dip of the top in glue,  I added beach glass to one, added sticker gems in a design and dipped another in glitter.  (top photo - center right)        *note- coat the glitter ring with clear coat or hairspray to stop it from shedding and cover the stones and gems with clear coat to help keep them on*

All the supplies fit a small cardboard suitcase and can easily be transported. (bottom right)


My girls used to love crafting with their babysitter and this craft is great because it is fast, easy and relatively mess free.  (moms love that :)  )


The girls wanted to wear the neon twine and yarn rings which makes me think you might not need "little" kids to make these rings...


Thursday, August 30, 2012

Wrap it up Thursday - the simple flower


A simple flower topper


From ellinee.com - link for tutorial here


I missed wrap it up Thursday last week so,  I had to finish off the summer with one final wrapping.  This one is so beautiful in it's simplicity.  It's been a big hit over on pinterest.  I am always overwhelmed when someone shares their hard work so generously and this wrapping is no exception.  With a download and print you are all set to create a simple and beautiful gift wrap that would fit a wedding, birthday, housewarming or shower gift.  All the hard work is done - now you can sit back and look like the thoughtful gift-giver you are.

Next week I hope to be back in full gear.  Kids back in school,  routines to establish and the last (hopefully) warm days to savour.  I've been playing around with pics for a new banner and I have a fun project for back to school babysitting gigs.

Have a great weekend!

Thursday, August 23, 2012

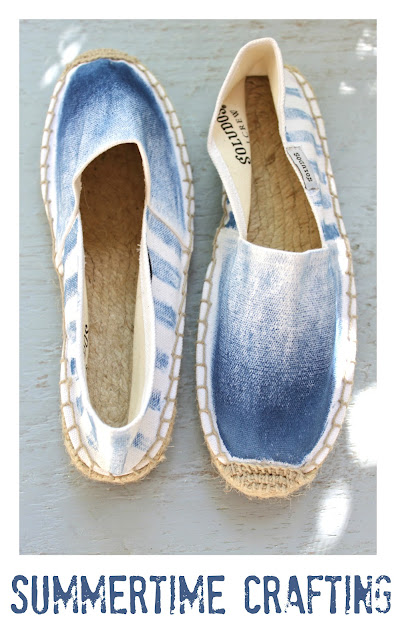
D.I.Y. Ombre Espadrilles


I came back from the Keys and dove right into a little project I have been thinking of for awhile.  While out yesterday, picking up fall books, I scooted by JCrew and saw that the Soludos (espadrilles) for JCrew were on sale.  $14.95, down from $24, down from $39 dollars.  I have been wanting to try dying a pair all summer and at this price, how could I resist?  

I wasn't fully prepared to take the leap until I tried a few sample ideas on some similar scrap fabric I had.  I originally thought that I would do some kind of ikat print but when I tried that, and chevrons, stripes and ombre - it was the stripes and ombre that I thought came out the best.


It was very easy to do ... and fast.  I used a Tulip one-step dye kit that required minimal fuss.  The powder is already in the bottle - you add water and shake.  Ready to go.  When it came to my samples, I used a simple little brush and I liked that effect the most.  I threw on the ombre sample for the front and the stripe sample for the sides and thought it might work.  Worst case scenario - I would paint the hole thing with the dye.  I also slipped plastic wrap into the shoe to fill out folds to make it easier to paint and also to prevent the dye from running through the fabric.  (Note - I used such little dye on the brush that it never made it through the fabric.  Not even on the toes.)


1 - I stared with the toe and worked out.  The dye worked a little different on the shoes than in my sample but I got the hang of it before I ruined the first shoe.

2 - Once I liked the depth of the colour on the toe, I continued working layers of the dye so that I was almost just dry brushing the area around the top of the foot.

3 - I just went freehand with my stripes and even though they weren't perfect it all seems to work itself out when it dries.   In other words, the dye on canvas appears very forgiving.  My first stripe, the width of my brush (about a third of an inch) started at the middle of the foot where ombre layer finished.  I worked the stripes on one side to the heel, than began the stripes on the other side at the ombre layer and met the stripes up at the heel again, eyeballing so that the stripes were as even as possible.

4 - Once I had the general idea with one shoe I went on to the other with the exact same steps.

5 - I worked just a little dye with the brush and filled out any obvious imperfections and areas that didn't seem dark enough. 


I am not sure if I might use my steam iron tomorrow to set the dye.  The directions say to wash the garment after letting it set (wet and covered in plastic wrap) for 6 - 8 hours.  I applied this dry so that won't work.  I am going to let it dry for a few days then steam.  Hopefully the whole thing doesn't run in the rain ... I'll let you know if it does.  I tried wetting the samples and they ran just a little but they hadn't set for long, so we will see.


I kind of wished I started this project at the beginning of the summer.  I could have made a whole rainbow of colours but they wouldn't have been on sale ... and therefore I wouldn't have wanted to take a chance so maybe this is for the best.  It's August and I think there is still a little room for summertime crafting ... don't you?

I hope September is warm ... 

Thursday, August 16, 2012

Mini Inspiration Boards for your Desktop


How I want to feel, where I want to be and how I want my home, have been reduced to a mini desktop collage I created for daily inspiration.


A while back, I created some desktop inspiration stones (left) from recycled glass based on a framed inspiration board I created in a workshop (right).  You can see that project here.  

We have some mini canvas frames we have collected from dollar stores and art stores.  I thought it might be fun to put together another desktop inspiration.


 To make my mini inspirations on canvas I began with my magazine collection and cut out phrases and images that fit my themes. (1)

I checked to see what it would look like laid out on the canvas (2)

I used acrylic modge podge and painted it on the canvas and the back of my images and words. (3)

I started with the images I wanted in my background (4)

I finished it all up with a coat on the entire top of the collage (5)


For my board that relates to inspiration for mind - I simply added the words to the plain canvas and clear coated.  (left)  For my board that inspires my coastal dreams I added a turquoise wash of paint and created an ombre effect, for my background.


Dreams, mind and home - all reduced to a canvas measuring 2X3 inches.

You know what?  I think it might already be working.  I'm off for a quick trip with a girlfriend down to the Keys - my coastal dream has already been achieved.  Next up - finding peace and zen ...

I'll be back here the middle of next week.  Have a great weekend!

Thursday, August 9, 2012

Wrap it up Thursday - Cottage Gifts


We've been invited to a couple of cottages this summer and I always struggle with what to bring to our generous hosts.  You want to be invited back again, right?, so besides helping out in the kitchen and cleaning up it's nice to let your hosts know how much you appreciate their hospitality.

Well, homemade goodies are always appreciated I think, but wrapped up in a nice package make them extra special. (first row)  The pancake mix left (Martha Stewart Weddings) and the homemade banana bread right (Jenny Steffens Hobick) are a nice way to elevate something simple.

(middle row left)  A new cottage owner would really appreciate a bucket of handy basics (Martha Stewart) and I think the fire starter right (Whole Living) piled up in a beautiful basket would be awesome.

(bottom row)  A simple jar of natural cleaning supplies (Julie Blanner) or cookies ready to make (Bakerella) would be an easy way to say thanks!

If you are really feeling crafty, and you have the time beforehand, wouldn't it be nice to make these coasters (Girl in Air) with map pieces of the lake or cabin you are going to.  I like this because they are super useful and the host will always remember your thoughtfulness, year after year.


This has been a gift I have put together a couple of times this summer.  The Zoku popsicle maker with the amazing watercolor popsicle tags from Creature Comforts.  They work so well together and for hosts with kids, I think it is a great gift that everyone can get together too make and enjoy. 

 Sometimes, those lazy days at the cottage affords all of us the time to play around with things like popsicle makers, where we may not take the time in a fast paced lives back in the city.    

I hope you are enjoying your last few weeks of the summer and even if you haven't had the chance to visit a lakeside cottage or cabin, these gifts still work for a barbecue for friends or why not have one yourself - maybe a popsicle making party? 


Monday, August 6, 2012

Kool Aid Dyed Knitting Needle Toppers


After reading stitch | craft | create magazine in the spring, and their article on dying yarn with kool-aid, I knew I had to give it a try.  I decided instead of yarn I was going to have a go with wool roving and come up with a felted project with all the bright colours.  I left the roving immersed in the kool-aid (1/2 cup water added to one package for each colour) for the better part of 24 hours.  Then according to the girls at Craft Magazine, I needed to set it in the microwave.  I put each colour of roving in its own microwavable bowl and sealed it with plastic wrap.  In for 30 seconds on high to check.  Then another 1 minute and 30 seconds to set the colour.


I decided to make topper for knitting needles and made the balls by needle felting on a felting pad using the technique I showed with my heart knitting needles and my bird pencil toppers for inspired magazine.


After the initial needle felting, I like to give the balls a hot wash in net bag in the washing machine. See the above before (left) and after (right).  I find they come out nice and compact with a consistent shape.


A little snip into the bottom of each ball for the needle and a snip (if required) of the needle top, for insertion.  Into the pouch made in each ball by the slit, I add a squirt of fabric glue - and the newly snipped needle end, and you are good to go ... or knit:)


One quick note.  You may need to add a number to your needle with permanent ink so you know what size it is. Some of the needles I use just have the size on the wooden top that you will be snipping off.


And ...  A word of caution.  After the roving dried almost completely, I put it in an aluminum pie tray to completely dry.  We were off to a cottage and when I returned I found that the kool-aid dyed roving ate through the tray.  CAN YOU BELIEVE IT ?!  Did you ever do that experiment in school where you took a tooth meant for the tooth fairy and dropped it into a cup of coke for a week to see what would happen.  And you found that your tooth was well rotted by the end of the week. (That worked for me ... never wanted to drink coke again!)  Well this does it for me with kool-aid - not that we had it around here for but it does make me think of the amount of sugar our kids can be exposed to!!!!  I asked my chemical engineer father what caused it and he things it was the citric acid and ascorbic acid in the mix.
Yikes!


I think that the reaction with the aluminum took away from some of the vibrancy of the roving but it is still a pop of colour in another wise plain pot of needles.  With the August weather (and the feeling of fall just a few weeks away) I need to stock up on fun little projects like this.  It will make my fall knitting just that much more cheerier.
Related Posts Plugin for WordPress, Blogger...