Showing posts with label diy. Show all posts

Sunday, September 1, 2013

Welcome Fall ... with a necklace DIY


Well it has been awhile and I can't say why - except that I'm busy with the new house and all the decisions big and small that come along the way.  I am thinking that this fall I am going to share some of the trials and tribulations of house building and share some of my design inspirations and dilemmas encountered.  There is so much out there to cull from but that can also be a stumbling block.  We'll see...


In the meantime... thank goodness for Jennifer Carroll and her Celebrating Everyday Life magazine.  She has forced me to come out of my box and rev up those creative juices again.  Without her prodding I am not sure I would keep "making".  I find it hard to deal with all the everyday stuff, including most of my supplies packed up in our rental, and get out the stash to make something.


I recently did get out the stash to make this "craft-stash necklace".  I was please at how it came out and plan to use up some of the rest of my supplies to make a version of this in a few other colours.  You can find out all about how to make it as well as some other gorgeous fall projects and style tips here.  Thank you again Jennifer for including me in your beautiful publication.


At the beginning of the summer, Jennifer got me busy again and I  came up with a re-work of a dollar store beach mat.  You can find out how to make this and other great projects at this link.


I hope to be back much more often this fall as the kids go back to school and life begins to follow along more of a routine.

See you soon friends...

Thursday, May 9, 2013

Mother's Day Prize Ribbon - DIY

Here is a quick gift for mom to wear to her Mother's Day Celebration...out of a coffee filter!


By dying the natural filter in red food coloring, I was able to layer up a prize ribbon, by adding a few embellishments.


STEPS TO CREATE THE "FLOWER"


First, flatten then soak the filters in red food coloring (some more than others)
I created the "flower" portion of my ribbon my layering one flat dark pink, one lighter pink with curled edges, one natural flower created with a running stitch and decorative running stitch border.
Next layer is a yo-yo with the folds outward and finally a centre button with the folds facing inward.
Sew all the layers together when you add the button.


Once I created the flower I added a special banner for mom.  To create the hanging ribbon portion I used strips of tissue and some hot pink fringe I had hanging around(lower left)
the tissue ribbon was cut in a dove tail (lower right)
 
I used a brooch backing in cardboard to the back of the assembly but you could just as easily use a safety pin.


I basically used the model of prize ribbons I have made for my etsy shop and the one I created in a detailed tutorial for amy power's inspired ideas birthday issue.

It's a fun last minute project to add a little something special to maybe a brunch or tea and you could customize it for a birthday or bridal shower.

I'll see if the girls let me wear it this Sunday ...  I'll probably embarrass them ... as usual

Wednesday, November 21, 2012

Feather Toppers - From Felt


As promised, here is a more "fallish" version of a felt feather topper.  Earlier in the week, I put together watercolour pencils and feather toppers.  Today I applied the same DIY to knitting needles.  A quick little craft project to squeeze into your day.  It uses up little bits and pieces you might have on hand (or ones that can easily be found and your local craft store) and in the end of a few crafty moments you have a little prezzie for someone special :)


1.   Once again, I cut out the feathers from felt bits and pieces, free hand.
2.  I added a few wraps of yarn to the top of the needles to create a base to glue the feathers on.
3.  The watercolour pencils came in handy for a feather tag.
4.  I added the needles to a small ball of yarn I had in my stash.  These needles packaged up with a few small project ideas would make a great little present for a niece or babysitter.  (project cards are from knit knack kit)


I'm not quite ready to do a full on Christmas themed project so this little project has eased me into winter.  From neon feathers to these autumn sky shades - somehow these colours make me want to light a fire and knit up a storm ... but I can't relax until we have finished trying to sell our house ... so little projects like these will have to do.

Monday, November 19, 2012

Felt Feather Topper


Wow.  It's been awhile.  I've realized that when I am under stress, I find it hard to be very creative.  Yes my knitting of leg warmers or socks actually helps to alleviate a bit of stress - or pass the time at coffee shops when we have house showing.  I even found the time to knit up a couple of monkeys for the shop.  But the creation of projects for the blog or anything else.  Forget about it.  And to make matters worse - I can't make a mess ... it's hard to be creative if you can't make a mess.  At least for me.

So... this project is my attempt at alleviating my creative frustration, and hopefully a little bit of stress as well.

I took a watercolour class in the spring and realized - You know what?... it's not as easy as you think.  That's why I love watercolour pencils.  They let you create a painterly effect, with some sketchy colours here and there, that is much more difficult to achieve with standard watercolours and brushes.

Ali had some watercolour pencils and during the house purge I came across one of my old pocket sketchbooks.

Just like I did for my spring project for Amy, I wrapped up a pencil, in this case a watercolour pencil, with yarn.  A dab of glue at the pencil tip and another at the base is all you need to hold it in place.  (1) With my pile of felt bits I decided a feather was a great shape to go with.  I just cut the feather shapes free hand and about 3/4 's of an inch wide and 2 inches high. (3)  Another dab of glue for each feather and you have a topper for your pencil. (2)   Two feathers each pencil seemed to work well.


Now, based on my feather theme, I continued with a label.  Just a watercolour pencil feather sketch ... add water to your scratches and it is pretty effective.  I actually really loved how my feathers turned out.  I think I will play around with this style of watercolour painting again.


This is an example of an inexpensive little gift you can put together for teachers, babysitters... friends of your kids.  I loved how I could use up my stash of little bits and pieces and create something new (I'm not allowed to bring anything new into the house when we are trying to sell it ... house rules :)   )


It all came together, wrapped up with a bit of yarn.  It doesn't scream holiday but sometimes that's good.

Stayed tuned later this week I will show a more fallish version of this gift topper.  But for now,  my gift giving is bright and cheery ... and quick and easy!


Tuesday, September 4, 2012

Babysitting Craft Kit - Plastic Rings


Who knew you could repurpose plastic milk carton rings into fun jewelry?  Well,  I saw this a lifetime ago in American Girl or some kind of kid's craft magazine.  I can't find the original story but I decided to do a new version, for the babysitting gigs the girls start getting in the fall. 


They have a group of girls they babysit that love to craft and it is always fun to find something for them to do that doesn't require alot of supplies or make a huge mess.


With a layer of glue, a piece of yarn or twine (one with the addition of a paper initial) can be wrapped in a circular design starting at the center.  (top photo and lower left)

Layers of paper tape can be arranged in a design and then lifted onto the front of the ring and then clipped and wrapped to fit. (middle row)

With a dip of the top in glue,  I added beach glass to one, added sticker gems in a design and dipped another in glitter.  (top photo - center right)        *note- coat the glitter ring with clear coat or hairspray to stop it from shedding and cover the stones and gems with clear coat to help keep them on*

All the supplies fit a small cardboard suitcase and can easily be transported. (bottom right)


My girls used to love crafting with their babysitter and this craft is great because it is fast, easy and relatively mess free.  (moms love that :)  )


The girls wanted to wear the neon twine and yarn rings which makes me think you might not need "little" kids to make these rings...


Thursday, August 23, 2012

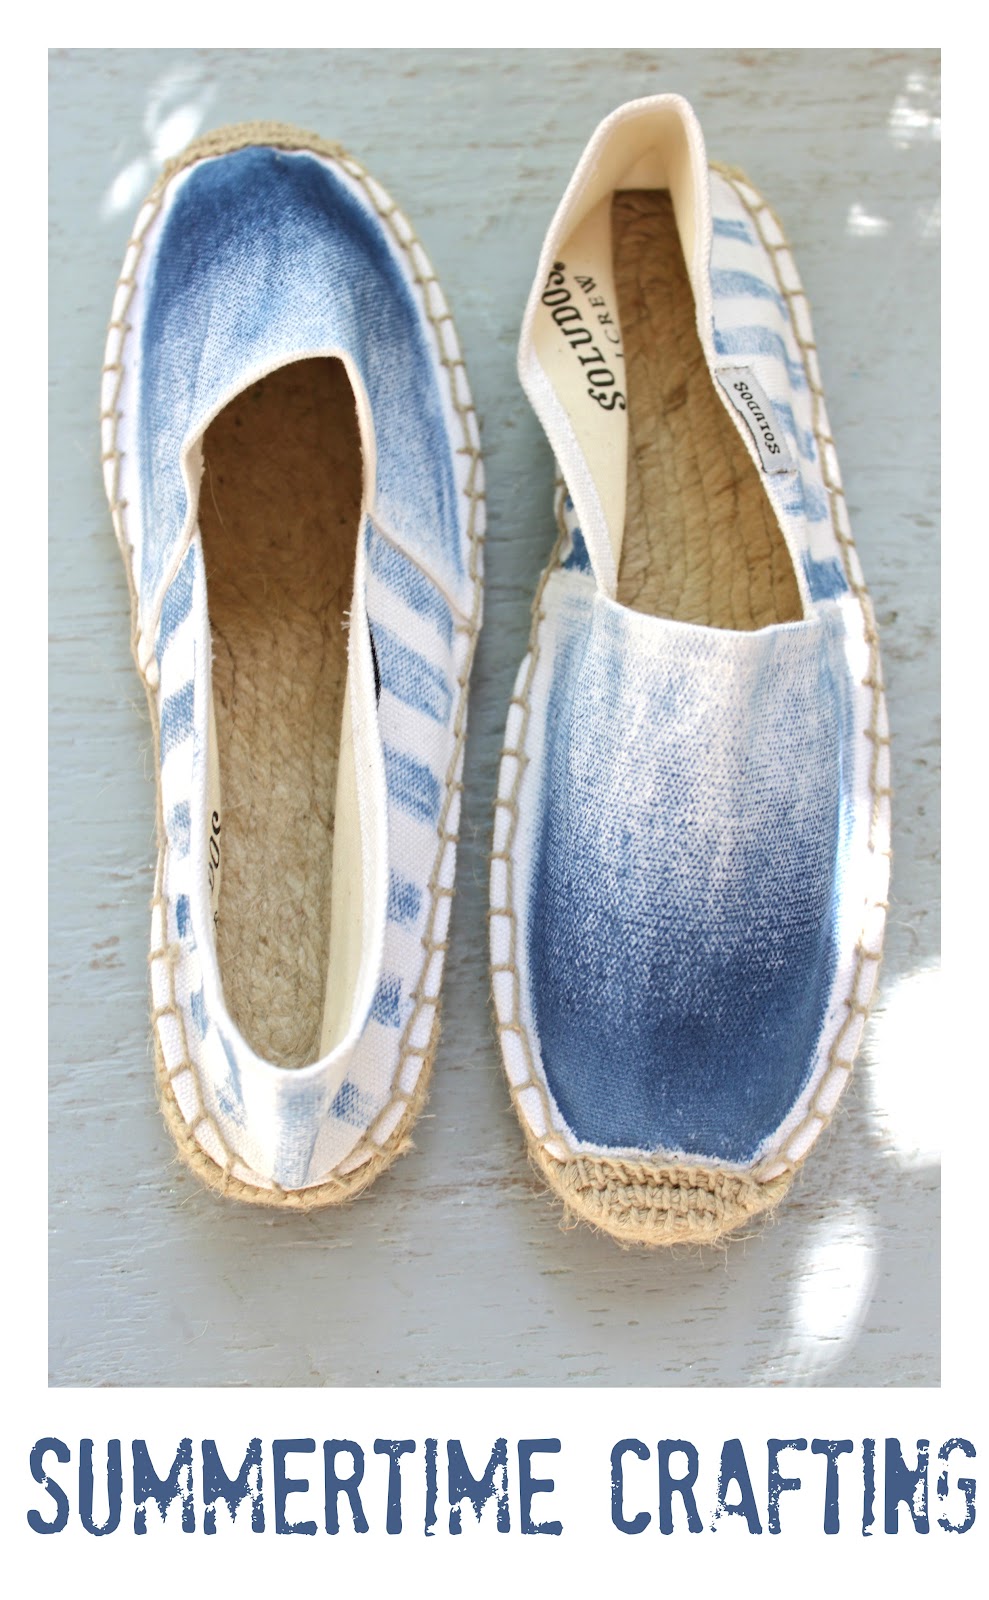
D.I.Y. Ombre Espadrilles


I came back from the Keys and dove right into a little project I have been thinking of for awhile.  While out yesterday, picking up fall books, I scooted by JCrew and saw that the Soludos (espadrilles) for JCrew were on sale.  $14.95, down from $24, down from $39 dollars.  I have been wanting to try dying a pair all summer and at this price, how could I resist?  

I wasn't fully prepared to take the leap until I tried a few sample ideas on some similar scrap fabric I had.  I originally thought that I would do some kind of ikat print but when I tried that, and chevrons, stripes and ombre - it was the stripes and ombre that I thought came out the best.


It was very easy to do ... and fast.  I used a Tulip one-step dye kit that required minimal fuss.  The powder is already in the bottle - you add water and shake.  Ready to go.  When it came to my samples, I used a simple little brush and I liked that effect the most.  I threw on the ombre sample for the front and the stripe sample for the sides and thought it might work.  Worst case scenario - I would paint the hole thing with the dye.  I also slipped plastic wrap into the shoe to fill out folds to make it easier to paint and also to prevent the dye from running through the fabric.  (Note - I used such little dye on the brush that it never made it through the fabric.  Not even on the toes.)


1 - I stared with the toe and worked out.  The dye worked a little different on the shoes than in my sample but I got the hang of it before I ruined the first shoe.

2 - Once I liked the depth of the colour on the toe, I continued working layers of the dye so that I was almost just dry brushing the area around the top of the foot.

3 - I just went freehand with my stripes and even though they weren't perfect it all seems to work itself out when it dries.   In other words, the dye on canvas appears very forgiving.  My first stripe, the width of my brush (about a third of an inch) started at the middle of the foot where ombre layer finished.  I worked the stripes on one side to the heel, than began the stripes on the other side at the ombre layer and met the stripes up at the heel again, eyeballing so that the stripes were as even as possible.

4 - Once I had the general idea with one shoe I went on to the other with the exact same steps.

5 - I worked just a little dye with the brush and filled out any obvious imperfections and areas that didn't seem dark enough. 


I am not sure if I might use my steam iron tomorrow to set the dye.  The directions say to wash the garment after letting it set (wet and covered in plastic wrap) for 6 - 8 hours.  I applied this dry so that won't work.  I am going to let it dry for a few days then steam.  Hopefully the whole thing doesn't run in the rain ... I'll let you know if it does.  I tried wetting the samples and they ran just a little but they hadn't set for long, so we will see.


I kind of wished I started this project at the beginning of the summer.  I could have made a whole rainbow of colours but they wouldn't have been on sale ... and therefore I wouldn't have wanted to take a chance so maybe this is for the best.  It's August and I think there is still a little room for summertime crafting ... don't you?

I hope September is warm ... 

Thursday, August 16, 2012

Mini Inspiration Boards for your Desktop


How I want to feel, where I want to be and how I want my home, have been reduced to a mini desktop collage I created for daily inspiration.


A while back, I created some desktop inspiration stones (left) from recycled glass based on a framed inspiration board I created in a workshop (right).  You can see that project here.  

We have some mini canvas frames we have collected from dollar stores and art stores.  I thought it might be fun to put together another desktop inspiration.


 To make my mini inspirations on canvas I began with my magazine collection and cut out phrases and images that fit my themes. (1)

I checked to see what it would look like laid out on the canvas (2)

I used acrylic modge podge and painted it on the canvas and the back of my images and words. (3)

I started with the images I wanted in my background (4)

I finished it all up with a coat on the entire top of the collage (5)


For my board that relates to inspiration for mind - I simply added the words to the plain canvas and clear coated.  (left)  For my board that inspires my coastal dreams I added a turquoise wash of paint and created an ombre effect, for my background.


Dreams, mind and home - all reduced to a canvas measuring 2X3 inches.

You know what?  I think it might already be working.  I'm off for a quick trip with a girlfriend down to the Keys - my coastal dream has already been achieved.  Next up - finding peace and zen ...

I'll be back here the middle of next week.  Have a great weekend!

Monday, August 6, 2012

Kool Aid Dyed Knitting Needle Toppers


After reading stitch | craft | create magazine in the spring, and their article on dying yarn with kool-aid, I knew I had to give it a try.  I decided instead of yarn I was going to have a go with wool roving and come up with a felted project with all the bright colours.  I left the roving immersed in the kool-aid (1/2 cup water added to one package for each colour) for the better part of 24 hours.  Then according to the girls at Craft Magazine, I needed to set it in the microwave.  I put each colour of roving in its own microwavable bowl and sealed it with plastic wrap.  In for 30 seconds on high to check.  Then another 1 minute and 30 seconds to set the colour.


I decided to make topper for knitting needles and made the balls by needle felting on a felting pad using the technique I showed with my heart knitting needles and my bird pencil toppers for inspired magazine.


After the initial needle felting, I like to give the balls a hot wash in net bag in the washing machine. See the above before (left) and after (right).  I find they come out nice and compact with a consistent shape.


A little snip into the bottom of each ball for the needle and a snip (if required) of the needle top, for insertion.  Into the pouch made in each ball by the slit, I add a squirt of fabric glue - and the newly snipped needle end, and you are good to go ... or knit:)


One quick note.  You may need to add a number to your needle with permanent ink so you know what size it is. Some of the needles I use just have the size on the wooden top that you will be snipping off.


And ...  A word of caution.  After the roving dried almost completely, I put it in an aluminum pie tray to completely dry.  We were off to a cottage and when I returned I found that the kool-aid dyed roving ate through the tray.  CAN YOU BELIEVE IT ?!  Did you ever do that experiment in school where you took a tooth meant for the tooth fairy and dropped it into a cup of coke for a week to see what would happen.  And you found that your tooth was well rotted by the end of the week. (That worked for me ... never wanted to drink coke again!)  Well this does it for me with kool-aid - not that we had it around here for but it does make me think of the amount of sugar our kids can be exposed to!!!!  I asked my chemical engineer father what caused it and he things it was the citric acid and ascorbic acid in the mix.
Yikes!


I think that the reaction with the aluminum took away from some of the vibrancy of the roving but it is still a pop of colour in another wise plain pot of needles.  With the August weather (and the feeling of fall just a few weeks away) I need to stock up on fun little projects like this.  It will make my fall knitting just that much more cheerier.

Monday, July 23, 2012

A few days ... for a bloggy break


I am taking a wee bloggy break this week. But rest assured, I have been working away on all sorts of projects.  Annoyingly, I sometimes do a bit of work on each one, not fully completing any of them, but that is another post entirely.


In a week's time, I'll be back ready to share the above and more.


In the meantime, I may be spending some of my time on the new window seat in my bedroom.  It was a floor model and perfectly fit into the jut out of my window.  I still have to decide how to deal with the curtains but I love how I can perch up over my front lawn, looking out at the oak trees and the hammock I have yet to perch on.


It's the perfect spot to hang out with my journal, mother's day pajamas and knitted socks.  The problem is, I only have the patience to hang out for a few minutes at a time.  There are so many summer projects, gardening projects, day trips and in general stuff to do, I often find that I don't appreciate the moments to enjoy some of the very projects I slog away at.

Well, I hope to work on that this week.

Here's to the breezy, warm summer days and nights that I hope you are all enjoying.  See you soon!

Monday, June 4, 2012

Rolling out a Lace Print - DIY


I've been playing around with some neon paints trying to create a lace patterned paper.


Last week I spied this beautiful lace print via a pin from Leslie Shewring on Pinterest from Ideas Magazine.


I set out to make something like this for myself although I must admit, my results are slightly different.  However, I still like the outcome.


I started with a lace doily from the craft room, a wooden rolling pin and some modge podge (1)  I covered the rolling pin with modge podge (2) and rolled on the doily (3) trimming it to fit (4 and 5)
I coated it with a layer of modge podge to give it a little seal (6) and it was ready to go (7)


With a box lid as my tray, I rolled the doily covered rolling pin in a few different shades to create some wrapping paper.


I tried combining the colours on the same sheet and also cutting strips of different colours to act as ribbon.  


I am going to try this project again and look for some different lace to create a more solid print as they did in ideas magazine.  In the meantime, I still like the lacey, loose print created with the cotton lace that I used for this.  It was fun to combine it with bright coloured twine - as seen above - a sneak peak of this week's  Wrap it up Thursday.
Related Posts Plugin for WordPress, Blogger...