Showing posts with label pink. Show all posts

Thursday, May 9, 2013

Mother's Day Prize Ribbon - DIY

Here is a quick gift for mom to wear to her Mother's Day Celebration...out of a coffee filter!


By dying the natural filter in red food coloring, I was able to layer up a prize ribbon, by adding a few embellishments.


STEPS TO CREATE THE "FLOWER"


First, flatten then soak the filters in red food coloring (some more than others)
I created the "flower" portion of my ribbon my layering one flat dark pink, one lighter pink with curled edges, one natural flower created with a running stitch and decorative running stitch border.
Next layer is a yo-yo with the folds outward and finally a centre button with the folds facing inward.
Sew all the layers together when you add the button.


Once I created the flower I added a special banner for mom.  To create the hanging ribbon portion I used strips of tissue and some hot pink fringe I had hanging around(lower left)
the tissue ribbon was cut in a dove tail (lower right)
 
I used a brooch backing in cardboard to the back of the assembly but you could just as easily use a safety pin.


I basically used the model of prize ribbons I have made for my etsy shop and the one I created in a detailed tutorial for amy power's inspired ideas birthday issue.

It's a fun last minute project to add a little something special to maybe a brunch or tea and you could customize it for a birthday or bridal shower.

I'll see if the girls let me wear it this Sunday ...  I'll probably embarrass them ... as usual

Monday, June 4, 2012

Rolling out a Lace Print - DIY


I've been playing around with some neon paints trying to create a lace patterned paper.


Last week I spied this beautiful lace print via a pin from Leslie Shewring on Pinterest from Ideas Magazine.


I set out to make something like this for myself although I must admit, my results are slightly different.  However, I still like the outcome.


I started with a lace doily from the craft room, a wooden rolling pin and some modge podge (1)  I covered the rolling pin with modge podge (2) and rolled on the doily (3) trimming it to fit (4 and 5)
I coated it with a layer of modge podge to give it a little seal (6) and it was ready to go (7)


With a box lid as my tray, I rolled the doily covered rolling pin in a few different shades to create some wrapping paper.


I tried combining the colours on the same sheet and also cutting strips of different colours to act as ribbon.  


I am going to try this project again and look for some different lace to create a more solid print as they did in ideas magazine.  In the meantime, I still like the lacey, loose print created with the cotton lace that I used for this.  It was fun to combine it with bright coloured twine - as seen above - a sneak peak of this week's  Wrap it up Thursday.

Tuesday, May 15, 2012

Neon Felt Ring - DIY


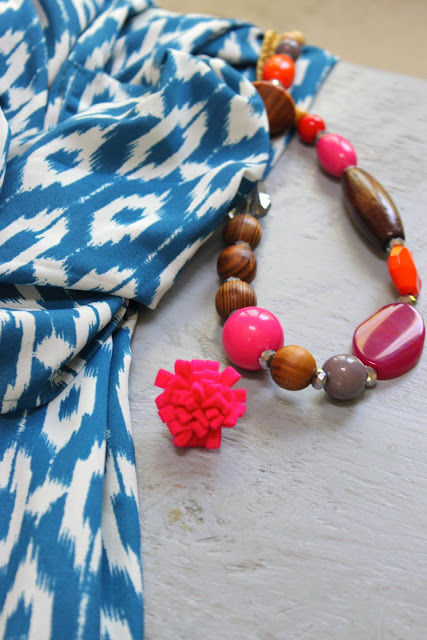
Last fall I made some felt rings with recycled cashmere in all the yummy fall colours.  Today was such a welcome bright day and I thought that maybe I could use up some of the felt bits I have left over from my neon coffee cup holder.  I have a wedding this weekend and I need one fun ring to pull it all together.


Supplies laid out on a sunny morning.  

I couldn't help myself this morning from making something fun and bright.  I have neon felt sheets, a needle and matching thread and some silver, adjustable ring forms.


Step 1 - felt strip about 6 X 1 inches

Step 2 - fold the strip lengthwise and press

Step 3 - snip cuts on the folded side and cinch with a running stitch (1/4 inch)

Step 4 - roll the strip starting in the centre and sew together and then stitch the flower you have created  to the ring base

You can find more details on how to make the rings here.


I have grown to like these bright colours and I think it is fun to add a hit of colour like this to a spring outfit.


So for the wedding, the girls picked this dress out for me at Anthropologie.  I wasn't sure it was me - but they were.  It was shown with this necklace and although I never would have put the two together Helana and Ali insisted I needed to have it.  This new felted ring, I think, will tie it all together.

Now I am off to find some fun bright pink wedges but I am going to keep the receipt because I need my stylists to approve it :)  Seriously, I am not kidding...

Monday, April 23, 2012

A Layer Cake from Better Homes and Gardens


The May issue of Better Homes and Gardens is out and if you haven't seen it, it has the most beautiful, tempting cake on the cover.  It is layers of that color.  You know, tangerine tango.  Maybe not exactly, more pink than that but still very 2012.  I haven't taken on a baking project for a while but this cake had me baking this weekend.  Okay, so it isn't perfect.  Next time I would use more of the icing between the layers and I would work on getting my layers nice and even but I do think that the color is bang on.  So pretty and fresh.


You start by tinting the whole batter with some red food coloring for light pink - taking out half to bake and adding more food coloring to the remaining batter, to get that deeper color.  The best thing about this cake, though, is the lemon flavor.  With concentrated lemonade and lemon extract the cake tastes as fresh as it looks.  It really is a simple cake, designed by Karen Tack of Hello Cupcake, and I appreciated that, as it pretty much took over my kitchen for the day.  Any more complicated and I might have spent the weekend on a cake.

It would be so pretty for a shower, bridal or baby, but I think I might perfect my layers and serve it up for Mother's Day.  Once again, perfectly imperfect... but tasty.

Thursday, April 19, 2012

Wrap it up Thursday - Neon Coffee Sleeve


I had some felt pieces that arrived to be the back of my prize ribbon brooches, but the colors didn't fit the fabrics that I use for the ribbons.  In fact, when I put them all together, I realized how similar they are to the neon pinks, limes and peaches that you find in everything from cards to scarves to interior design.


1 - Hen & Chicks Collective in Rue Magazine (found in Discover Paper)  2 - Yeah Card from Ship and   Shape     3 - Spring at The Gap    4 - Color Collective (found through Decor8)


I must admit, I have mixed feelings about the neon and color combinations that are so prevalent this spring.  I was around the first time these colors hit the streets.  I had big hair and puffy sleeves and I am not sure it was my finest moment.  Perhaps those times weren't as stylish as these, but I am still not quite sure how to incorporate them into my current style.

So, instead,  I took advantage of these miscued color combinations and put together  a handy sleeve for my coffee that also holds my keys and coffee card.  I'm all set for a quick walk with Rufus.


I used an existing cardboard sleeve as a template and cut one large felt piece in neon green. (1) Then I added bits and pieces including a pouch for a card and a tab at one end for a key fob. With yarn, I sewed the felt pieces to the one large green piece, although you could do this with a machine. (2)  I added one small decorative peach strip with fabric glue.  Once I had my pieces in place, bottom left (3), I turned the sleeve inside out and wrapped it around a cup for positioning (4), also finding a spot to add a bit of elastic for give.  After I sewed the small piece of elastic to the overlapping ends (5) I turned the sleeve right side out and sewed up the the overlap closest to the key fob, so it all lays flat. (6) Now the sleeve is ready to go!


At one end I have a fob to add a car or house key and in the middle is a pocket for a coffee card or money.  I can just hook it to the dog lead and head out the door.


Hello Spring!

Thursday, March 1, 2012

Wrap it up Thursday - Sweater Cuff for a Take out Cup


 We have a new tea shop in my neighbourhood with the most beautiful take-out cups.  They really don't need a pretty cuff to cover them up but they are awfully hot.


To make the cuff :

1 - I used the arm of a felted wool sweater and some bright coloured yarn.  I used a thick needle I use for knitting, and embroidered a design with the yarn.
2 - I cut off the wrist end of the sweater - it is the perfect size for a cup cuff.
3 - I just used some of the blue yarn to edge the finished edge of the cuff 
4 - and the pink yarn to stitch up the unfinished edge.  Then I added decorative stitching as a pattern around the cuff.  I turned the cuff inside out to tidy up the loose ends.


I followed the existing sweater "knit" stiches to create my pattern.


That's it.  Play with any design you like - and your cup cuff will be ready in jiffy.  Say that three times fast!


Thursday, February 16, 2012

Wrap it up Thursday - Wrapping up a Bracelet


I am being a little sneaky today.  Wrap it up should really be about packages and wrapping ideas but I am feeling uninspired today - and the weather isn't helping.  But - I still think these WRAP bracelets, made by us,  still sparkle in the low light.  I can't tell you how exciting it was - last month when my husband was away for work- and the girls and I crafted.  It's been awhile but we were so motivated by the great tutorials we found - how could we not help ourselves.  I was in heaven.  Watching movies and making things - with my girls.  It happens less and less these days and so this meant the world to me.  And it is so easy, effective and relatively inexpensive.


For friendship bracelets all you need is a embroidery floss and a clipboard. Cheap.  For the other bracelets - from our local bead shop - soft leather cording (about a foot a yard), waxed thread (a few dollars a handful), sweet unusual buttons (50cents), bottles of beads (about $1.75 to $3.75 depending on the type of bead) and finally from the hardware store - hex nuts at 15 cents each and brass and silver ball chains at around 50 cents a foot.

For a few dollars each you can create these ...


1 - This is where we began.  You can make this bracelet with different coloured threads and really change the look.  This is from makebraceletsblog video tutorial

2 /4 /6- These are from Honestly WTF  and they are simple to make and gorgeous

3 - This is another version (Honestly WTF)- on our to-make list

5 - This occupied everyone's time after camp this summer.  This purl bee tutorial is terrific.

7/8 - Finally another on our to-make list from Honestly WTF using the hex nuts, all on their own.


So there you have it - a good movie, popcorn and a few supplies and you can wrap up a wrist-full of bracelets.  

Thanks for letting me diverge from the plan today- just a little :)


Tuesday, February 14, 2012

Love Note Wreath


I started with my some of my collection of notes from my family.  I scanned them and printed them out on watercolour paper that I had washed in valentine colours.

I took a styrofoam wreath and wrapped it in yarn.  With pink push pins,  I took heart cut-outs of my letters and pinned them along the wreath in one direction.

It hangs by my desk and reminds me of all the love we share - notes from special occasions.  Now, instead of in a box, this is a gentle reminder of sentiments from my loved ones - throughout the year.


Helana and Ali Valentine DIY Roundup


In case you missed it here are a few valentine projects that I worked on the past month.


I am hoping to post a DIY for a love wreath later today.


Have a great Valentine's Day!

Monday, January 30, 2012

Knit up some Love


Felted Heart Knitting Needles are a sweet gift for a mom, sister, aunt or teacher - really anyone that LOVES knitting.


Take a small amount of roving and needle-felt into a heart shape (1)  Make slits at the bottom of the heart for the needle and take the clipped ends of two knitting needles (2)  gluing the needle ends into the pouch you created at the bottom of each heart and (3)  your needles are ready for gifting (4)


Felting the Hearts -

1. Create a loose heart shape with roving - about twice the final size you want, as it will reduce in size as the fibers firm up with friction.  (It is not necessary to used a felting pad but I found it useful)
2.  I needle-felted around the entire heart in order to keep it full, not flat, in shape.
3.  Needle-felt another heart from approximately the same amount of roving.  They don't have to be exact - it's the imperfections that make them sweeter.


This step is not necessary but I like to put the hearts in a laundry bag and run them in a short, hot wash cycle in my washing machine.  They come out denser and plumper.


I took bamboo needles in the needle size I use most and clipped the ends.  With small, sharp scissors I snipped the pointed ends of the heart and added fabric glue.  I held it in place to secure and now they're ready to give to someone special.


These are so cute ... I might just have to gift them to myself!


Happy almost Valentine's Day.

Tuesday, December 20, 2011

Holiday Color Inspiration Part Two

Holiday Inspiration from Knitting a Sock


 You may recall that knitting a sock inspired me to go with a color inspiration of pink and green.  I must say it has taken some time for me to put it together.  And I am not sure I will stick with it every year but I did have fun doing something different.


I came across these amazing snow globe cloches featured in Poppytalk and I was drawn to the cover of Heather Sprigg's Gatherings Gift Guide cover and its yarn wrapped branches.  I just grabbed what I had at home - a bell jar, my yarn and some branches I usually keep in the basement...oh, and some styrofoam for the glittered tree and one to shave into snow for the bell jar.

It created a bit of a mini winterland - just above my fireplace.


A good spot to curl up and finally finish my other sock...

Related Posts Plugin for WordPress, Blogger...