Showing posts with label valentines. Show all posts

Tuesday, February 14, 2012

Love Note Wreath


I started with my some of my collection of notes from my family.  I scanned them and printed them out on watercolour paper that I had washed in valentine colours.

I took a styrofoam wreath and wrapped it in yarn.  With pink push pins,  I took heart cut-outs of my letters and pinned them along the wreath in one direction.

It hangs by my desk and reminds me of all the love we share - notes from special occasions.  Now, instead of in a box, this is a gentle reminder of sentiments from my loved ones - throughout the year.


Helana and Ali Valentine DIY Roundup


In case you missed it here are a few valentine projects that I worked on the past month.


I am hoping to post a DIY for a love wreath later today.


Have a great Valentine's Day!

Thursday, February 9, 2012

Wrap it up Thursday - Last Minute Valentine Round-up


 Sweet - Valentine Pouches.  I simply love The Purl Bee.  I was in my glory when I went to their shop in SoHo and I have made many of their projects that they share on line.  I think this is one of the sweetest ones yet and although it is one of the more ambitious projects in this valentine round-up, it is still very doable.  The project is laid out with beautiful simplicity and even if you make just a couple for your sweeties (instead enough for a whole classroom!) it is sure to bring a smile.


A gumball necklace. I made this last year for my girls.    It is the presentation that makes it work. So simple and so charming.  This project is from One Charming Party.


 If all you do is cut up a simple banner like this and hang it up - it's a party.  This is from Rebecca Cooper Photography.


Here is a simple re-wrap - how easy is that.  Very, very clever - and I think so realistic from Living Lucurto.


I also did this last year.  Another rewrap.  This is from Eat, Drink, Chic. Just a simple way to dress up a favourite local coffee shop take out.


This is my favourite this year.  From Sweet Muffin Suite, another simple download.  I have another idea of what to put in, instead of the pencil but we'll just have to wait.  I don't want to spoil the surprise.


I think it is so wonderful that all these artists and crafters share their artwork.  It makes last-minute gift giving  easier ...but still special.

Plug in your printer, fire up your sewing needle and get out the scissors.  This valentine's day can be all wrapped up in no time.


Monday, February 6, 2012

Felted Macaron Tutorial


These felted macarons were inspired by a visit to a beautiful pastry shop -


(Here is our instagram )                                   
 -  and a knitting lesson.

The girls took a knitting class - actually kind of had a mini - stitch and bitch - at a local shop about 4 years ago now.  One of the first projects a young knitter can try are these oreo cookies.  Here is one we have left from our craft sessions. (on the right)

  
Well, I had some pretty pink cookie layers knitted up sitting around the craft table (for 4 years!) without a project in sight.  I thought that maybe if I tried felting them in a hot water cycle in my washing machine I might be able to make them look more like a macaron - and lo and behold - it worked!

If you want, you can follow the original directions for the oreo cookie from here.

In a nutshell - this is what I did.


Felted Macaron Supplies
Bits and pieces of macaron coloured WOOL yarn leftovers.
Knitting needles - I used the heart shaped ones I made here - they are a size US #7
Large sewing needle used for knitting projects


Making the macaron layers


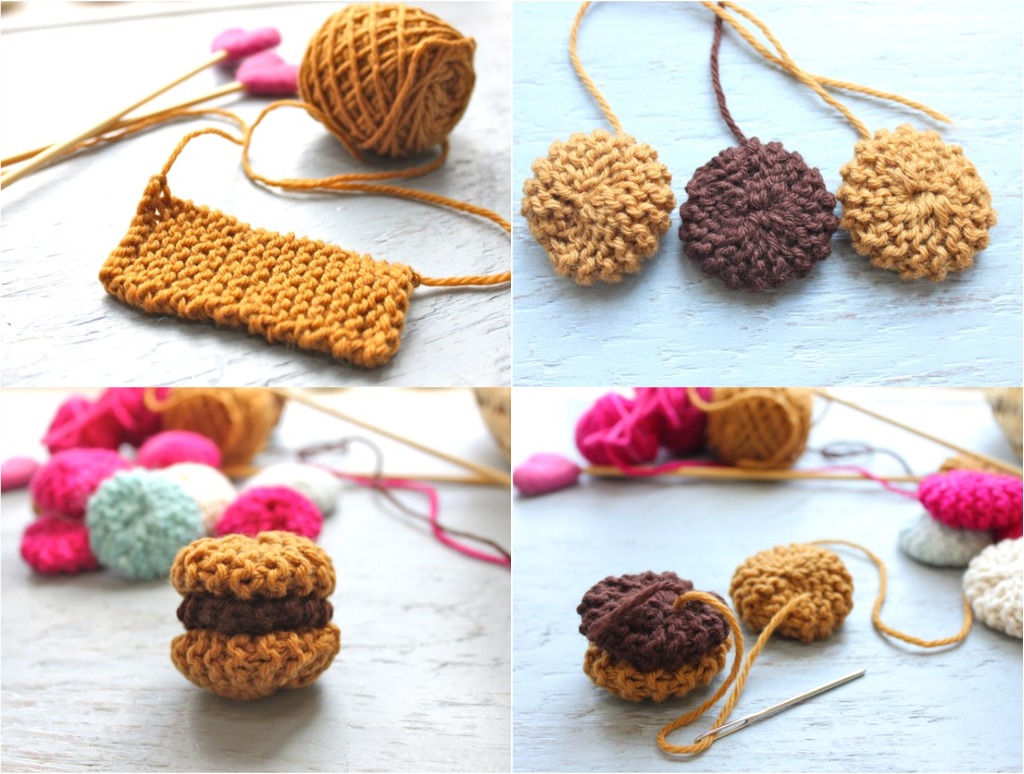
Your pattern is simple - 8 stitches cast-on and 32 rows of garter stiches - or 16 ridges. (1)
Leave about an 8 inch tail after binding off and run that through the ridges on one long side. (2)
Cinch these stitches together so they meet at the top and stitch through to secure. (3)


Now stitch the two short ends together to make a little cap shape. (4)
Turn it inside out and now run the needle and thread through the ridges on the open bottom and cinch (5)
After you pull tight you will create a ball shape (6)


If your layer is going to be the centre of your macaron you might want to stitch it more flat (7)
Your flat layer is ready to be stitched into a macaron between two other layers (8)


Here are the layers ready to be stitched up.  I think they look like all those knitted poufs that are all the rage.  Only dollhouse sized.


Here are the layers of a macaron being stitched together.(Clockwise from top left)  I didn't stitch the outer light brown circles together to make them flat (just the brown centre) - when you wash them those outer layers will be puffier - just like a real macaron.


Here are two little guys ready for their hot wash.


These pictures illustrate how they come out of the wash and the final product.  
On the left you can see the puffiness.  While still damp, I flatten them out with pressure, to be more macaron shaped (right picture)
As you can see, the lilac macaron on the far left never really felted properly. Not enough wool content in the yarn - but I think that is okay.  I love the colour and the texture is kind of neat too.  It's fun just to pick some yummy colours and experiment.


 I thought they looked sweet with another lonesome craft project - this knitted mug - I got the pattern from here.  (pom pom emporium) I mean - some might say - what are you going to do with felted macarons.  Not sure - cute little pin cushions (I actually use the mug to hold some of my knitting needles) ... maybe a gift for a toddler's play kitchen ... 

who knows ...  maybe ...

just because ...

Happy almost Valentine's Day!


Monday, January 30, 2012

Knit up some Love


Felted Heart Knitting Needles are a sweet gift for a mom, sister, aunt or teacher - really anyone that LOVES knitting.


Take a small amount of roving and needle-felt into a heart shape (1)  Make slits at the bottom of the heart for the needle and take the clipped ends of two knitting needles (2)  gluing the needle ends into the pouch you created at the bottom of each heart and (3)  your needles are ready for gifting (4)


Felting the Hearts -

1. Create a loose heart shape with roving - about twice the final size you want, as it will reduce in size as the fibers firm up with friction.  (It is not necessary to used a felting pad but I found it useful)
2.  I needle-felted around the entire heart in order to keep it full, not flat, in shape.
3.  Needle-felt another heart from approximately the same amount of roving.  They don't have to be exact - it's the imperfections that make them sweeter.


This step is not necessary but I like to put the hearts in a laundry bag and run them in a short, hot wash cycle in my washing machine.  They come out denser and plumper.


I took bamboo needles in the needle size I use most and clipped the ends.  With small, sharp scissors I snipped the pointed ends of the heart and added fabric glue.  I held it in place to secure and now they're ready to give to someone special.


These are so cute ... I might just have to gift them to myself!


Happy almost Valentine's Day.

Thursday, January 26, 2012

Wrap it up Thursday - Love in a Cup


The images from today's post are from Think Garnish.  At this site you can view their blog, shop and see how other people use their products.  I love the rippled craft cup , as a sweet little gift.  It seems to make everything - even your morning coffee special.  It helps to add those sweet spoons - a simple little teacher gift for Valentine's Day.


These containers were for Christmas but can you imagine if you show up with doughnut holes in these cute containers with the additions of a simple heart on top.  You would be a hit at the office.  Some gourmet (or maybe not so gourmet) take out food packaged simply like this  (on the right) makes a great housewarming gift.


Some may see an empty cup but I see a world of crafting and gifting possibilities.

Tuesday, January 24, 2012

A Valentine Treat Box


Here is a quick little repackage of red hot lips into some boxes I had from Helana's previous etsy business.  I threw the red hot lips inside a coffee filter into the box.  Coffee filters are one of my favourites.  With a little chalkboard paint you can customize your little treat for each recipient.

Now I just have to stop myself from eating the example!


Thursday, January 19, 2012

Wrap it up Thursday - Wrapping Love Hearts


When the girls were smaller we sometimes went to great lengths to come up with a special valentine for their classmates.  In Grade 1, Helana and I made pink lollipops for all the kids.  In Grade 3, Ali and I made felt fortune cookies (sort of like Martha's) with a fortune and a chocolate kiss.  Both were a lot of work but still fun.

Now that they are older the kids don't do the old fashioned exchange but I think it is still nice to have a handful of treats for some special friends and teachers.  I've been trying to come up with ideas that are based on repackaging ... and I mean - simple repackaging.


I think this is cute, fast and easy.  I picked up these little love hearts at a local candy store and came up with two quick ways to make them a little more special.


The first is simply kraft paper and washi tape. 


 You could even right a little sentiment on the tape before wrapping ... if you desired.  Bakers twine kind of finishes off that candy feel but I also wrapped some with bright pink yarn.


The other is wrapped in tissue and glitter.


I used clear contact paper, sprinkled glitter down the center and then attached the contact sheet to a few layers of white tissue.  Done.


I hope the girls think these are cute and then, that could be something we do together over a hot chocolate one day after school.


 Of course if we do that, our hot chocolate is going to have to look like this
... and so it goes.


Related Posts Plugin for WordPress, Blogger...