Showing posts with label felt. Show all posts

Thursday, December 12, 2013

Wrapping up with Felt


Well hello there.  It's been awhile :)    I've been busy but sadly not with fun stuff here.  I did manage to wrap up a small piece for Jennifer Carroll's Celebrating Everyday Life November/December Issue.  I just grabbed my mess of supplies from our dingy rental basement and threw together a little tutorial on taking fabric, yarn and felt scraps and making them into something you could be proud to give.


Here is a little detail from one of the toppers.


You can check out all the great ideas and stories here.  I really love this cover ... I am tagging it for next year's holiday.


One of my favorites is the cocoa party!!!  I dream of setting up something like this on my new stone porch.  There is something so welcoming about a cup of hot chocolate.  For now it is a dream, as we continue to finish up all the little and big details at the new house.


One of my favorite cocoa gift ideas is busy getting pinned over on pinterest.  You can find it here and here.

I hope to be back before the holidays to share a couple of wrapping and gift ideas.

Until then ...


Keep Warm!

From my hot cocoa recipe (see above)


Thursday, January 24, 2013

Felted Soap Stones

felted soap stone spin photo gif_shop-1_zpsc25f008a.gif


What is a person to do when it is cold outside? Play around on the computer.  Clearly a one handed gif is a little wobbly but you get the picture.

As promised weeks ago I am going to share a quick little project I squeezed in, in between cleanings and house viewings.  These soap stones are not new to the crafting world but they are alot of fun to make and I love trying to replicate the felt roving strands to look as much like a beach stone as possible.
I have many little soaps I have received as gifts that I could never use up.  My dad also brought me some lovely lavender soap from the south of France on one of his cycling trips.  I have tons of the stone coloured roving around that I bought when our local knitting shop closed down.  Helana used to make them for her pet pebbles.  Combine them all and you have a little stone of soap ready to use or gift to a friend.


The oval soaps make a really authentic beach stone.  The little eggs look so cute as little pebbles.

The centre image in each photo shows how you can just wrap up the stones loosely in the roving before their hot water treatment.


1 - supplies at hand including a small felting needle (optional) soaps and roving - grey, brown and    natural
2 - loosely wrap the soap with grey first, then a few strands of the light brown and finally strips of the natural to create the veining.
3 - I ran some very hot water over my creation just to get an idea of how the placement is working
4 - all that fluffy roving attaches itself to the soap with a few dunkings.
5 - to really pack it down I put them in nylon sockettes and rubbed them
6 - I let them drain at the bottom of the kitchen sink


They make a nice little hostess gift.  I'm thinking they might look good piled on in a bowl in our new powder room.  I have about a year to plan that so I'll have to tuck these away in the pile of boxes that are amassing themselves all over the house.  

Keep warm and toasty!

Wednesday, November 21, 2012

Feather Toppers - From Felt


As promised, here is a more "fallish" version of a felt feather topper.  Earlier in the week, I put together watercolour pencils and feather toppers.  Today I applied the same DIY to knitting needles.  A quick little craft project to squeeze into your day.  It uses up little bits and pieces you might have on hand (or ones that can easily be found and your local craft store) and in the end of a few crafty moments you have a little prezzie for someone special :)


1.   Once again, I cut out the feathers from felt bits and pieces, free hand.
2.  I added a few wraps of yarn to the top of the needles to create a base to glue the feathers on.
3.  The watercolour pencils came in handy for a feather tag.
4.  I added the needles to a small ball of yarn I had in my stash.  These needles packaged up with a few small project ideas would make a great little present for a niece or babysitter.  (project cards are from knit knack kit)


I'm not quite ready to do a full on Christmas themed project so this little project has eased me into winter.  From neon feathers to these autumn sky shades - somehow these colours make me want to light a fire and knit up a storm ... but I can't relax until we have finished trying to sell our house ... so little projects like these will have to do.

Monday, April 2, 2012

Gatherings Magazine - Feature - DIY Spring Nest Pin


Heather Sprigg's new issue of Gatherings Magazine is out and it is lovely.  I have been a fan of her previous issues, so it was a real honour to be asked to contribute to the spring issue.  My contribution is a D.I.Y. for creating a spring nest brooch in either linen or felt.  It would be great on a spring jacket or would make a cute placecard for your Easter table or Mother's Day celebration.


Heather is now making it possible to order this current issue and all others -  for only $4 - that means each issue is less than a coffee or $1 each. Click the link above or at right, for more information.


The issue also includes the beautiful styling and words from my friend Maaike of the blog Crejjtion.  Maaike has recently made a move to Canada from Amsterdam and in this issue she shows off her beautiful crochet work and how she is making her new home all her own.


Okay, now it's official - Spring is here!


ps. still time to sign up for spring desktop giveaway here

Monday, February 27, 2012

Felted Bowls - for Organizing


You may recall from my last post , I have been on a bit of a tear lately.  My mood is a bit suspect and so when I look around at the usual mess of life it sometimes makes me want to scream.  Time to weed out all the bits and pieces that are unnecessary.  Sometimes I think I want to get rid of all my itsy, bitsy crafty odds and ends and start with a clean slate.  I would probably just start to make and collect again but the idea is tempting.


One thing I have made over the past few years that helps me sort out some of this "mess" and corral all the odds and ends are felted bowls.  I like them because they are a project but also because they are nice and soft and you can put in special jewelry or lay them on top of a more precious surface and not worry.  I began making the bowls based on a pattern from Leigh Radford's book One Skein.  Love that book and these bowls knit up easily. Although, I must admit at first, before I gave them a hot wash, I was worried that they would be too flimsy but they do wash up quite firmly, especially the smaller bowls.  I started making up my own sizes, once I got onto how it all worked.


Although I can store all sorts of things in these bowls I think my favourite is my collection of felted balls both store bought, homemade and knitted.  You have probably seen the bowl pop up in shots and I always find it a source of inspiration.  


Well one crafted project is complete and stored away.
My felted bowl runneth over with felted goodness.  Now... where are my scissors...

Tuesday, February 14, 2012

Helana and Ali Valentine DIY Roundup


In case you missed it here are a few valentine projects that I worked on the past month.


I am hoping to post a DIY for a love wreath later today.


Have a great Valentine's Day!

Thursday, February 9, 2012

Wrap it up Thursday - Last Minute Valentine Round-up


 Sweet - Valentine Pouches.  I simply love The Purl Bee.  I was in my glory when I went to their shop in SoHo and I have made many of their projects that they share on line.  I think this is one of the sweetest ones yet and although it is one of the more ambitious projects in this valentine round-up, it is still very doable.  The project is laid out with beautiful simplicity and even if you make just a couple for your sweeties (instead enough for a whole classroom!) it is sure to bring a smile.


A gumball necklace. I made this last year for my girls.    It is the presentation that makes it work. So simple and so charming.  This project is from One Charming Party.


 If all you do is cut up a simple banner like this and hang it up - it's a party.  This is from Rebecca Cooper Photography.


Here is a simple re-wrap - how easy is that.  Very, very clever - and I think so realistic from Living Lucurto.


I also did this last year.  Another rewrap.  This is from Eat, Drink, Chic. Just a simple way to dress up a favourite local coffee shop take out.


This is my favourite this year.  From Sweet Muffin Suite, another simple download.  I have another idea of what to put in, instead of the pencil but we'll just have to wait.  I don't want to spoil the surprise.


I think it is so wonderful that all these artists and crafters share their artwork.  It makes last-minute gift giving  easier ...but still special.

Plug in your printer, fire up your sewing needle and get out the scissors.  This valentine's day can be all wrapped up in no time.


Monday, February 6, 2012

Felted Macaron Tutorial


These felted macarons were inspired by a visit to a beautiful pastry shop -


(Here is our instagram )                                   
 -  and a knitting lesson.

The girls took a knitting class - actually kind of had a mini - stitch and bitch - at a local shop about 4 years ago now.  One of the first projects a young knitter can try are these oreo cookies.  Here is one we have left from our craft sessions. (on the right)

  
Well, I had some pretty pink cookie layers knitted up sitting around the craft table (for 4 years!) without a project in sight.  I thought that maybe if I tried felting them in a hot water cycle in my washing machine I might be able to make them look more like a macaron - and lo and behold - it worked!

If you want, you can follow the original directions for the oreo cookie from here.

In a nutshell - this is what I did.


Felted Macaron Supplies
Bits and pieces of macaron coloured WOOL yarn leftovers.
Knitting needles - I used the heart shaped ones I made here - they are a size US #7
Large sewing needle used for knitting projects


Making the macaron layers


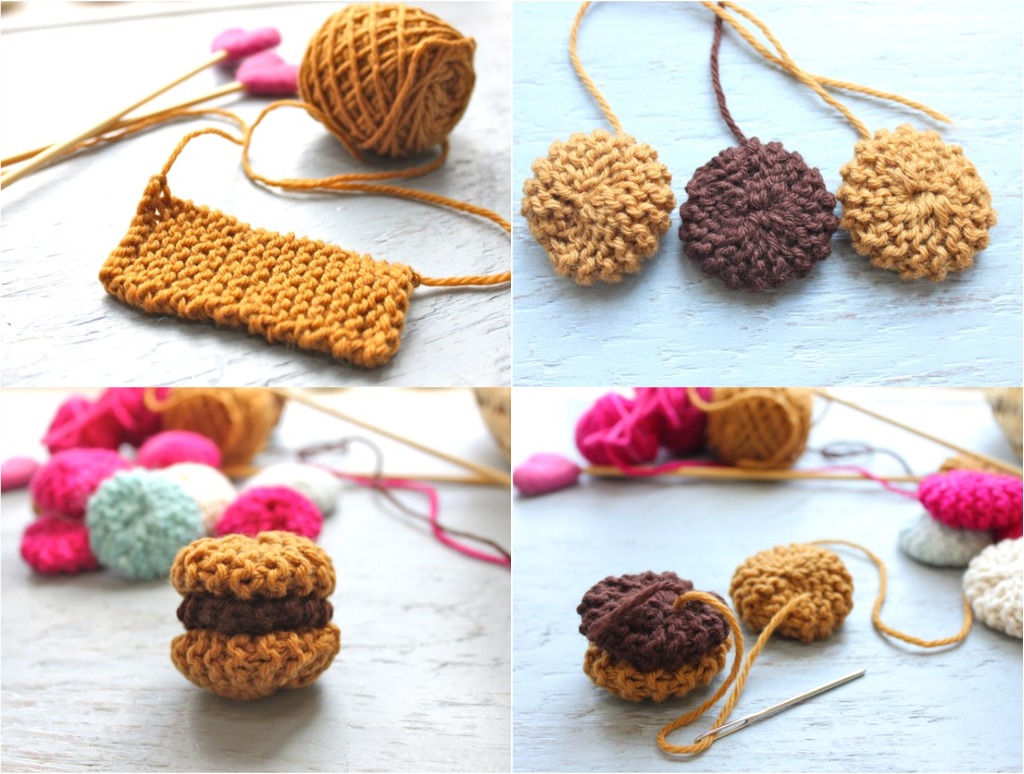
Your pattern is simple - 8 stitches cast-on and 32 rows of garter stiches - or 16 ridges. (1)
Leave about an 8 inch tail after binding off and run that through the ridges on one long side. (2)
Cinch these stitches together so they meet at the top and stitch through to secure. (3)


Now stitch the two short ends together to make a little cap shape. (4)
Turn it inside out and now run the needle and thread through the ridges on the open bottom and cinch (5)
After you pull tight you will create a ball shape (6)


If your layer is going to be the centre of your macaron you might want to stitch it more flat (7)
Your flat layer is ready to be stitched into a macaron between two other layers (8)


Here are the layers ready to be stitched up.  I think they look like all those knitted poufs that are all the rage.  Only dollhouse sized.


Here are the layers of a macaron being stitched together.(Clockwise from top left)  I didn't stitch the outer light brown circles together to make them flat (just the brown centre) - when you wash them those outer layers will be puffier - just like a real macaron.


Here are two little guys ready for their hot wash.


These pictures illustrate how they come out of the wash and the final product.  
On the left you can see the puffiness.  While still damp, I flatten them out with pressure, to be more macaron shaped (right picture)
As you can see, the lilac macaron on the far left never really felted properly. Not enough wool content in the yarn - but I think that is okay.  I love the colour and the texture is kind of neat too.  It's fun just to pick some yummy colours and experiment.


 I thought they looked sweet with another lonesome craft project - this knitted mug - I got the pattern from here.  (pom pom emporium) I mean - some might say - what are you going to do with felted macarons.  Not sure - cute little pin cushions (I actually use the mug to hold some of my knitting needles) ... maybe a gift for a toddler's play kitchen ... 

who knows ...  maybe ...

just because ...

Happy almost Valentine's Day!


Friday, October 21, 2011

Felt Flower Ring


I love to use old scraps of felt or wool to make a ring.  It is the kind of ring I love to wear in the Fall when the leaves have changed color and the temperature dips.


I use scraps of felt or wool - approximately 1 inch long and 5 inches wide.  And you need a ring form (adjustable) for your base.  For this example I am showing three different ring bases that I found at my local beading store.  You can make any of these forms work.


Once you have your strip of felt (mine is from felted second hand scarf) you fold it in half lengthwise and press or pin it so that you can cut into the fold.  Make sure you don't cut all the way.  Basically you are making fringes about 1/4 inch wide stopping 1/8 of an inch away from the end.


Now make a running stitch along the length of your fabric through the both layers of fabric, opposite your fold.


Now cinch the fabric into a flower by tightening up the running stitch.  Then you sew the bottom of the flower together through all the layers so it will keep it's shape.


Continue to stitch the flower base onto your ring base.  Some bases will require just a few stitches to hold it there but others will require a row of stitches.  I like the simple one if I am giving it as a gift but if I can only find the fussier ring form I will use that for my own stash of rings.


I get together with my girlfriends for a lunch before the holidays and this would be a great gift to give each lady in her favorite color.  But these ones are in my favorite color... hmm....


Related Posts Plugin for WordPress, Blogger...