Thursday, March 29, 2012

Wrap it up Thursday - Knitted Jam Jar Cover


These beautiful glass jar wraps are from Leigh Radford's, One More Skein and were shared via a post on Design*Sponge.  They are covering up a mayonnaise jar, a peanut butter jar and a jam jar.  They kind of remind me of my faux knitted vase but all the better - the real thing.  And because there is glass inside they make a great flower vase.  These knits remind me of getting ready for fall but, with some bright blue cotton, I created the jar cover for my spring giveaway.


 I improvised following the beginning of her pattern for a lace jam jar.  (The third pattern on the design* sponge post) To make my cover I used a pretty, bird egg blue cotton yarn  and US #4 needles.  (Leigh's pattern calls for  #9 needles - but for my little jam jar this worked the best )  You begin by knitting in the round, starting at the bottom of your jar cover.  Once I had completed the portion that made up the circular bottom, I just continued with the stocking stitch in the round, for my body,  until my cover was tall enough to cover up the glass jam jar.  Then I just finished with a simple bind off.


There is still time to enter the draw for the wrapped up jam jar and the three spring pencils.

 If you would like to enter the contest, add a comment here.

Finally, thank you to all of you for taking the time to enter and for all your lovely comments.  It really, really means so much to me.

Tuesday, March 27, 2012

Giveaway - Springy Pencils


In honor of the amy power's spring 2012 inspired ideas magazine, I thought I would giveaway the spring pencil project that I did.


 The prize includes the three pencils shown - bluebird, grey and brown branches and the cream and blue nest.  I am also throwing in a light blue knit covered mason jar to keep them by your computer.

What do you need to do - you say?  Well, although not required, please spread the word about my blog and the magazine and if you are so inclined become a helana and ali follower (see the right hand bar)

Required:  Add a comment to this post letting me know your name 
(I also ask that if your email is not associated with your comment name ie google sign-in etc. that you include it in your comment, or email me, so I can let you know if you won)

Winner will be randomly selected Monday April 2nd at 6 pm. EST 


We have a winner:  AprilsArtisticAvenue - email me with your address and your prize is on it's way!


Here are a couple of the pages from my springy pencil spread.  Here, I give you all the details on how you can make your own spring desktop - but if you win - you won't need to :)


The magazine is loaded with all sorts of adorable spring projects so if you want to see more, order your own magazine here.

It's nice to know spring is just around the corner, don't you think!

Monday, March 26, 2012

Springy Desktop

The new edition of amy power's inspired ideas is out.  You can read all about it here.  And you can order up a digital copy here.  

I was lucky enough to have a project in this season's issue.  I decided to add some spring to my desktop. The old fashioned kind of desktop - pencils for my desk "top".


There you go, yarn-wrapped and topped up - add some spring to your desk top -for your journal writing, to-do lists, tax filing or just to look cute.


Stay tuned for a give-away in the next day or so.

Thursday, March 22, 2012

Wrap it up Thursday - Making Flower Tags


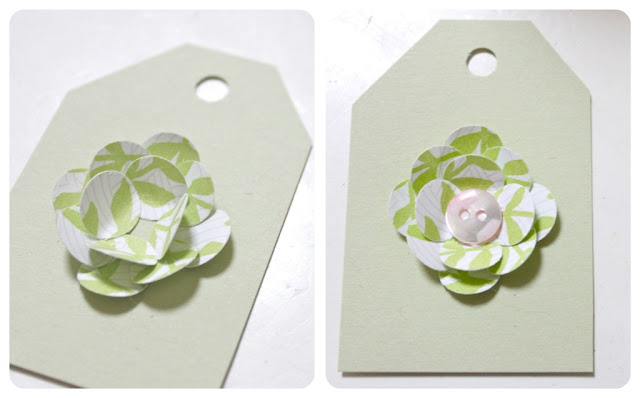
These little tags are from a collection that Helana and Ali made, over the course of a few days, a couple of years ago.  They were quite proud of their handiwork and I must say that they were great to grab last minute to jazz up a simple gift.  They are made with a collection of circles punched from scrap paper.  This is a great project to do with kids ( say 10 to 12 years old) over the period of an hour or so and at the end of all that good, crafty fun you will hopefully be left with a handful of cute tags to boot.   


I can't really take credit of this technique -it is all the girls'.

Row 1 - It started with lots of different scrap papers, ribbons, buttons, solid card stock, tacky glue and a circle paper punch.  Row 1 picture 2 - The girls used a pencil to round the circles into petals.  You could use a premade tag but we custom cut ours from cardstock. Row 2 - they began to arrange the circles, starting with the outer petals and then overlapped the circles into the open spots, as they layered into the centre of the flower.  


The final layer has the circles overlapping in the centre leaving room for the button in the centre.  These flowers are made up of three layers of petals, four petals in each layer.


Add a ribbon and you are good to go.


Loads of tags at the ready and a fun hour or two of crafty goodness - what could be better?!

Monday, March 19, 2012

Chevron Dish Tutorial


I picked up a little white dish, for just a few dollars, at the hardware store the other day and thought that with a little ceramic paint, I could jazz it up.


I wanted to try making a chevron pattern and, after playing around with tape with no success, I remembered that I had some transparent lamination sheet.  It is clear and sticky on one side and, as an added bonus, it has dots on the paper side that made measuring the chevron stripes that much easier.  Clockwise from top right. 1)Supplies, 2)making the chevrons by connecting dots with the ruler, 3)placing the strips inside the dish to fit, 4) sticking down the strips sticky side down and using a stiff brush with the paint so that the stripes have a slight texture to them (that is my preference - not necessary).  I also surrounded the sides of the dish with Japanese paper tape so that the stripes were only painted on the bottom of the dish.


The transparent sticky sheet seems to work well.  It made for mostly clean lines when I pulled the strips up and I was able to use a razor to clean up a few minor smudges.  According to the ceramic paint that I used you can wait a couple of weeks to completely dry or fire in the oven to finish the process.  The dish is really cute, and although it is considered dishwasher safe, it is not food safe so I am using it for jewelry on my dresser.

Just a quick little project to liven up my morning routine.  Turquoise Blue always gives me a boost.

Thursday, March 15, 2012

Wrap it up Thursday - Krafting a Package


Look at all this krafty goodnes.  Gorgeous twine, simple paper bags, kraft labels and parchment- like twine.  There is something so beautiful with these somewhat utilitarian wrappings.


From top clockwise - twine  Hempcraft, bags The Party Studio, Scallop Tags Inspire Lovely,
Paper Twine PaperPhine


First Row, Jute wrapworks, Kraft Paper Bags Inspirelovely
Second Row, Paper Bags  Wrap so Pretty,  Cotton Twine, Inspirelovely


I just love the simplicity of a gift covered in kraft - it's spareness seems to somehow add a sophistication to a gift.

Rice Krispie Squares seem gourmet (Thinkgarnish), A simple gift wrapped in a kraft coffee filter (a creative mint) and food gifts simply wrapped and tagged (sweet paul)
All somehow seem elevated in a plain but beautiful wrapping.


So grab some office supplies, pantry staples and garden twine and wrap up a hostess gift - it will always look chic and stylish!

Monday, March 12, 2012

Tutorial - Ikat inspired Stamped Canvas Bag


Believe it or not, I made this bag with a sweet potato and some fabric paint.


I was inspired by a fabric I found on Spoonflower called Beyond the Sea Ikat by threeyellowplums.   In fact, the whole Beyond the Sea collection is swoon worthy.

I used a canvas bag from our local art's store for $5.  Inspired by my ikat print, I knew I had to create a grid, to make sure the stamps lined up correctly.  Top right - I used a 2 inch wide ruler and made grid lines (every 2 inches) with fabric chalk along the diagonal of the bag from corner to corner.  Then, repeated the lines in the the other direction.  Bottom left - these grid lines created intersecting points.  Bottom right - I sketched out an image for my stamp and made paper templates from construction paper to test it out.

Please note - I used white fabric chalk to create my grid lines.  I think I would recommend disappearing fabric ink.  Firstly, it would have illustrated my lines more clearly for demonstration purposes but also the paint stamped on top could possibly paint in your chalk lines.

 Each paper image was placed on the intersection of grid lines.  As I added the paper templates, I could see that my pattern was going to work and create a pattern of light and dark. 


I gave the sweet potato a flat, smooth cut through the centre and used my paper template to trace a shape for carving - kindergarten-style.  I could have used something else to stamp but I wanted the colour to look washed out and imperfect.  What I loved about my inspiration fabric was the handmade quality of it.


1 - I made the first stamp on an intersection of grid lines. I also placed a barrier inside the bag, between the two layers, so the paint couldn't bleed to the other side.
2 - As I continued to stamp I could see the pattern and colour was working. 
3 - I took my little potato stamp and rubbed it along a paper plate of paint, making sure there was never too much paint that could create a blob. 
4 - I put newspaper under the edges when I needed just a partial part of the stamp over the grid line.


It seemed kind of plain on it's own, so I made some tassels with twine that I braided and tied onto the handle.


Here's my bag, ready for the beach, the library or my knitting.

Now bring on the sun!

Thursday, March 8, 2012

Wrap it up Thursday - French Country Wrapping


There is a lovely french shop in my hood that carries all sorts of french milled soaps.  So cute but often they are displayed in pots for purchase and ... they are naked!  It is hard to pass these on as a gift unwrapped but you don't want to go too crazy ... it's just a soap... but it is a french one, so I went with a french country wrapping, using twine, ticking, paper tape, office labels and something extra.


I nestled the soap in some kraft paper shredding.  It looks cute but more importantly it stops the soap from getting banged up on the corners.  I just used a little candy bag from the bulk food store and punched some holes in it and added a strip of ticking.  I ripped a strip from the fabric strip. I think it looks more french all tattered.  I love the look of taking those boring labels from the office supply and jazzing them up with Japanese Paper tape. It's a trick from Leslie Shewring of A Creative Mint.  If you peruse her blog you'll see all sorts of great labels and other creative ways with paper tape.  


I think the key (sorry) to this little package is this adorable key I found in another French store uptown. And with the keys at only 75 cents each - I should have picked up more - hopefully they aren't all gone .... ANYWAY - at 75 cents it makes the package quite inexpensive.  The worst thing is when you spend more on the package than the gift - and if, it would be hard to believe, your recipient doesn't appreciate the key detail and trashes the wrapping - hey it's no great loss.


There it is. 
 A cute little package for a cute little soap.  
It would make a great hostess gift or teacher gift. 

I know I said I liked the shabby ticking I used for the bow but it is all I can do, now that I see this picture,  to not snip that one loose thread off and take another picture... but it is getting too dark this afternoon for another picture.  Must resist...must...

Monday, March 5, 2012

Birthday Inspiration - On the Road


1  Fabric Tassel Banner - Prudent Baby                    4   Paper Hats - A Subtle Revelry
2  Cloud straws - Lisa Storms                                    5   Cake Banner - Tuck and Bonte - Etsy
3  Tissue Cluster - Blue Eyed Yonder                       6   Paper Lanterns - Landee See, Landee Do
                                                                                                                 via Looly Jane Boutique


Helana's Birthday is coming up in the next week and I need to plan some decorations that I can take on the road.  I looked at my pinterest boards for some ideas and I think I have come up with a plan.  I couldn't find tissue clusters in the exact colour I wanted but you can see where I am going with my colour palette.  I just love that fabric tassel banner - I might make mine from crepe paper or paper napkins - we'll see what I can find in my hood.  I think I can match some scrap paper to my colour theme and have the templates for the hats and add them to existing party hats at our destination.  Adding that little cake banner to the cake we come up with is going to be adorable.  The paper lanterns are made from paper bags - how easy is that?

How easy... well we'll see.  If I can get it together I will show you my birthday travel pack later this week.

Thursday, March 1, 2012

Wrap it up Thursday - Sweater Cuff for a Take out Cup


 We have a new tea shop in my neighbourhood with the most beautiful take-out cups.  They really don't need a pretty cuff to cover them up but they are awfully hot.


To make the cuff :

1 - I used the arm of a felted wool sweater and some bright coloured yarn.  I used a thick needle I use for knitting, and embroidered a design with the yarn.
2 - I cut off the wrist end of the sweater - it is the perfect size for a cup cuff.
3 - I just used some of the blue yarn to edge the finished edge of the cuff 
4 - and the pink yarn to stitch up the unfinished edge.  Then I added decorative stitching as a pattern around the cuff.  I turned the cuff inside out to tidy up the loose ends.


I followed the existing sweater "knit" stiches to create my pattern.


That's it.  Play with any design you like - and your cup cuff will be ready in jiffy.  Say that three times fast!


Related Posts Plugin for WordPress, Blogger...